Pages

Thursday, December 12, 2013

more stockings

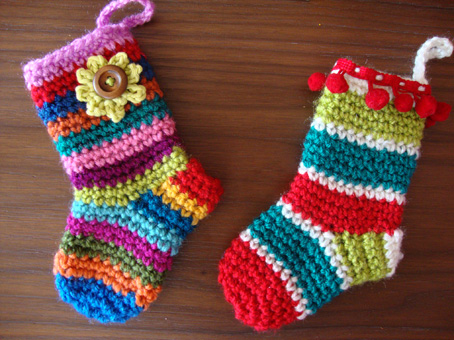
Here are some more stockings they are more decorative but they are soo cute.

http://www.lemondedesucrette.com/2011/11/16/little-christmas-socks-the-pattern/

Hello hello hello!
How are you today?
WWOOOOOOOOW! I am soooo thrilled by all your wonderful comments concerning the little socks:) Thank you so much! I could not make you wait longer so I managed to finish quickly the “how to” so I can share it with you today :)

It is very easy you’ll see but I hope that I’ll find a way to explain it to you by using simple words…
For these I used Nako Vizon a 100% acrylic yarn with a 4.5mm crochet hook…You can crochet with the yarn that you want but careful to pick up the right size crochet hook ;)
The socks are made using a single stitch (apart the beginning chain stitch (maille en l’air in french)) and it is: d.c (U.K terms) or s.c (U.S terms) or maille serree (in French)!
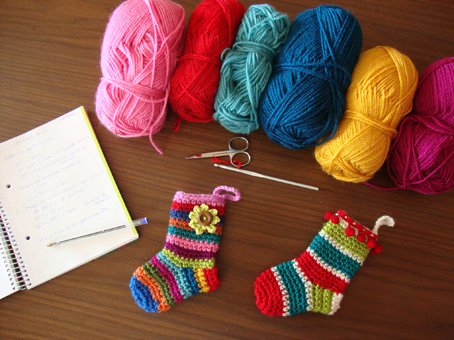
I’m gonna make with you step by step this one:
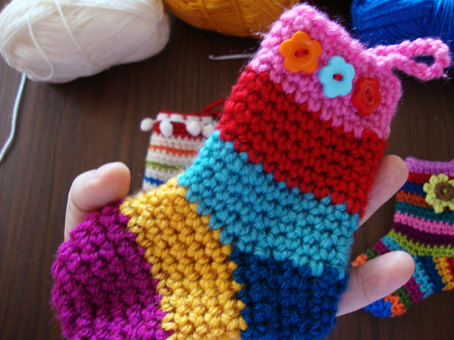
Here is a graphic pic to show you from where to begin and where to end with colorful parts:

I’m gonna explain it to you with pics :) Don’t worry it is very easy :)
So? Are you ready? Did you prepare some yarn and a crochet hook? Let’s maaaaaake it ! yahooooooooo! :D
I suggest that you make a sock with a single color to try out the pattern first and then you can make your own multi colorful one :)
For this one I used 6 different colors as show in the graphic above…
PART1:
Let’s begin with Part1 in the graphic pic (purple and yellow)
First (with the purple color) you begin with a circle of 4ch chain (4 mailles en l’air pour commencer)
R1: 10 dc (or sc) in the circle (10 mailles serrees dans le cercle)
R2: You crochet 2 dc in every dc of the previous round that make a total of 20 dc ( crocheter 2 m.s dans chaque maille du tour precedent ca fait: 20 m.s au total)
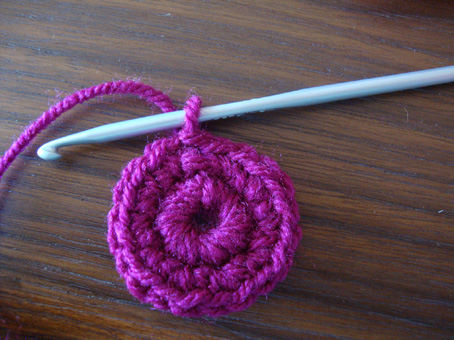
R3 to R11: 20 dc (20 mailles serrees) (R1 to R6: in purple R7 to R11: in yellow)
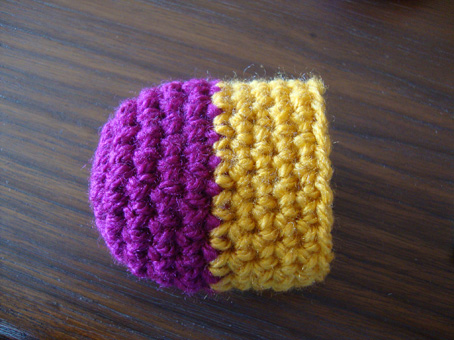
That make a total of 10 rounds of 20 dc. (purple and yellow colors part)
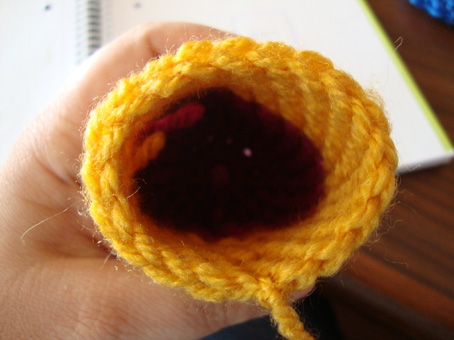
END OF PART 1
So? Is that ok for you so far? You just did the Part 1 :) bravo!
Let’s continue… shall we?
PART2:
R12: 10 dc (10 m.s) (With the dark blue color you crochet on half of the stitches of R11, that makes a total of 10 dc)
and you continue making rows of 10 dc until R17…
(avec la couleur bleu nuit crocheter sur seulement 10 m.s du tour precedent ca fait un total de 10 m.s)

You have now something like these pics above and down…
So R12 to R17: 10 dc (10m.s)
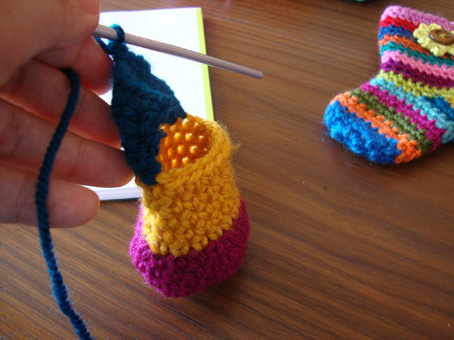
You just did PART2!
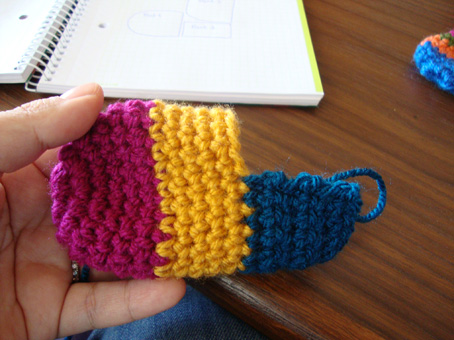
You have now something similar to the pic above.
After crocheting R17 you have to close and sew the right part of your sock (see the graphic pic at the beginning of this post : sew here after crocheting part2)
Apres avoir crochete PART2 fermer le cote droit de la chaussette par quelques points de suture (regarder le graphique du debut de ce post pour savoir ou)
END OF PART2
PART3:
With the turquoise color: R18: 22 d.c (22m.s) 
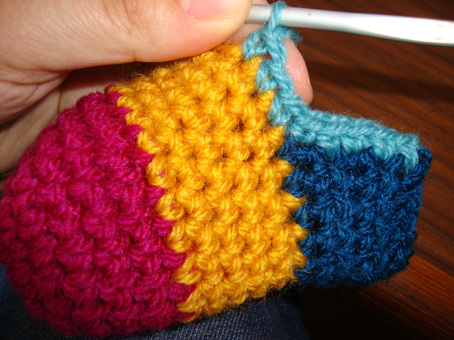
For R18 you have to join together the dark blue part and the yellow part with a round of 22 dc (22m.s) as shown on this picture: (6 dc on the dark blue part + 10 dc on the yellow part + 6 dc on the dark blue part = 22 d.c )
R18: (6 m.s sur la partie bleu nuit + 10 m.s sur la partie jaune + 6 m.s sur la partie bleu nuit = 22 m.s au total )
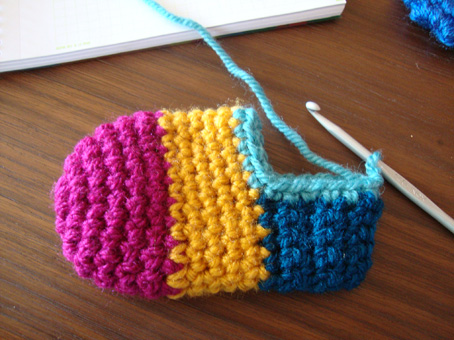
and you continue from R18 to R 33: 22 d.c ( De R18 a R33: 22 m.s)
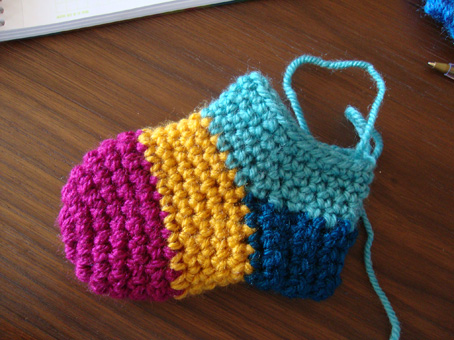
R18 to R22: 22 dc with the turquoise color (22 m.s)
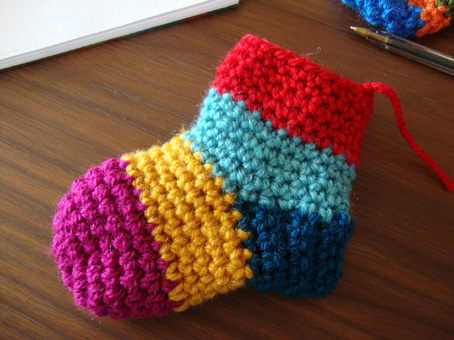
R23 to R27: 22 d.c with the red color
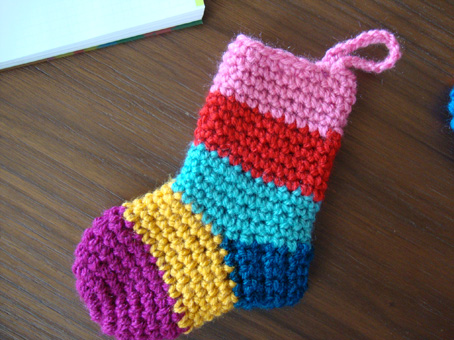
and finally R28 to R33: 22 d.c with the pink color
You close your little sock by making a chain of 17 ch so you can hang it :) (fermer avec une chainette de 17 mailles en l’air pour accrocher la chaussette)
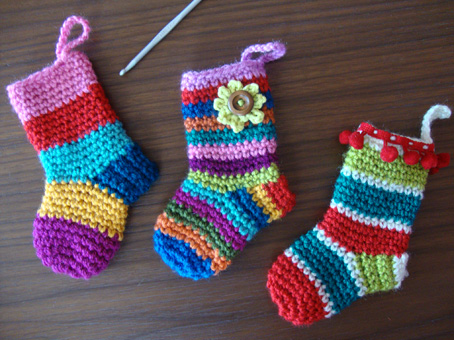
You did it ! Your little sock is ready :)
You can embellish it by adding some buttons, ribbons or beads…
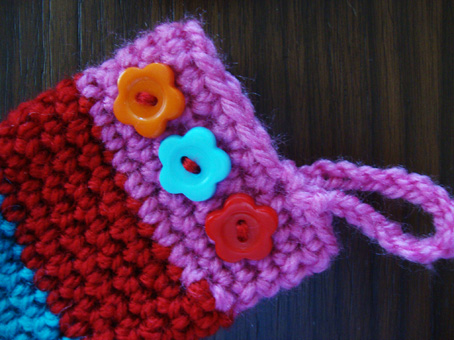
Ufff! It is done :) I don’t know if I was clear enough for you to understand…do excuse me if no (this is the first time I make this kind of step by step pattern)
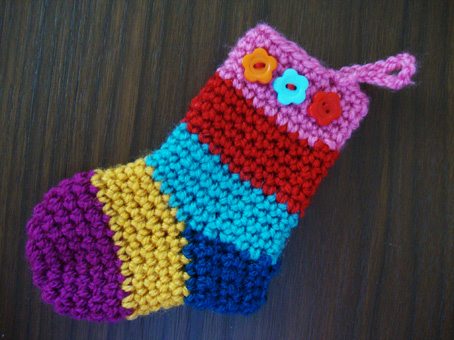
If you have any question, do not hesitate… I’ll be more than happy to help :)
Do not forget to tell me if you ever crochet these little Christmas socks I would really really love to see your own version…
Kisses to all!
and Happy crocheting :)
Sucrette

Free Christiams patterns from Red Heart

Here are some more cute ideas. I have posted the link below as they come in pdf files.

Gingerbread Boy with Heart


Santa Hat


http://www.redheart.com/free-patterns/gingerbread-boy-heart

The Balm Sock

Here is another mini stocking for the small gifts. It is also an idea for an advent calendar for a countdown to Yule or Christmas.

http://www.simplynotable.com/2011/its-the-balm-sock/

It’s ‘The Balm’ Sock

Christmas decoration from Little Cotton Rabbits

Another set of crochet decorations for Yule and Christmas. They are just too cute not to share.

knitted holly

This is a bit fiddly but worth the effort and if you can interpret my instructions I'm sure you'll be pleased with the way that you get a distinct vein up the center of the leaf.
Hopefully I've explained it well enough to follow - if you have any suggestions on a better description of the twisted stitch please drop me a line.
Many thanks!

Holly2_2

Holly:
Using 2.25mm needles and 4ply yarn cast on 3 stitches
Row 1: Purl
Row 2: K1, YFON, K1, YFON, K1 (5 stitches)
Row 3: P1, twist a*, YFON, P1, YFON, P2 (7 stitches)
Row 4: K2, twist b**, YFON, K1, YFON, K into back of next stitch, K2 (9 stitches)
Row 5: P3, twist a*, P5 (9 stitches)
Row 6: K2tog through the back, K5, K2tog (7 stitches)
Row 7: P2tog, p3, P2together through the back (5 stitches)
Row 8: K2, YFON, K1, YFON, K2 (7 stitches)
Row 9: P2, twist a*, YFON, P1, YFON, P3 (9 stitches)
Row 10: K3, twist b**, K1, K into back of next stitch, K3 (9 stitches)
Row 11: P2tog, P5, P2together through the back (7 stitches)
Row 12: K2tog through the back, K3, K2 tog (5 stitches)
Row 13: P2tog, P1, P2tog through the back (3 stitches)
Row 14: K1, K2 together pass first stitch over, pull end through  to cast off
Abbreviations:
YFON = Yarn forward over needle - makes an extra stitch. Start with the working yarn at the back of the work, bring it over the right hand needle to the front and back under the right hand needle again to the back so making a loop.
* twist a = insert right hand needle into the back of the made stitch purlwise, slip onto the righthand needle and slip back onto the lefthand needle so that what was the back of stitch becomes the front. Purl into back of this stitch)
** twist b = insert right hand needle into the front of the made stitch knitwise, slip onto the righthand needle and slip back onto the lefthand needle so the back of stitch becomes the front. Knit this stitch )

Holly
To make the berries:
Using 2.25mm needles and red 4ply yarn, Cast on 3
Row 1: P3
Row 2: K1, YFON, K1, YFON, K1 (5 stitches)
Row 3: P5
Row 4: K5
Row 5:P5
Row 6: K2tog through the back, K1, K2tog (3 stitches)
Row 7: Slip 1, P2 tog through the back pass slip stitch over, thread end through to cast off
Tie both cast on and cast off ends together and use one end to sew base together and make a small ball
Making up
Sew 2 leaves together at a slight angle, position desired number of berries in center and sew in place.
Copyright © Julie Williams 2006.


knitted mini christmas stockings


Stockings

I knit this stocking flat
A) because I don't enjoy knitting in the round and
B) because I think it gives greater flexibility in working fairisle and other intarsia designs.

Tree_stocking
I tend to work it on double pointed needles because during heel shaping you need to switch from working one side to the other. You can knit it on regular needles but slide the work across onto a second needle at appropriate time. Apart from the stocking top it is worked in stocking stitch (knit on right side and purl on reverse)
Stockings6
Materials:
oddments of yarn. I prefer to knit these on 2.75 mm needles with pure cotton 4ply but the pattern will knit up with whatever you prefer. Note, obviously the larger the needle size and thicker the yarn, the larger the finished stocking. Before you start, decide which colour you are going to knit the heel in and cut a length at least 110cm (44”) keep to one side for second heel shaping*.
PATTERN:
Cast on 25 sts, **(27 if knitting one of the stranded designs charted below)
rows 1 - 3: knit
row 4: (right side) begin pattern from charts below (if required)
work a total of 14 rows of pattern ending with a wrong side row.
**if working in one of the stranded / fairisle designs: on last wrong side row of pattern chart decrease 1 stitch at either end to give 25 stitches

Stocking chart2

Start at the bottom of the chart for the pattern charts
Heel shaping:
I like to use different coloured yarn to accentuate heel. The heel is worked in 2 halves.
row 18: with right side facing, k7 and turn leaving remaining stitches on needle
row 19: slip 1, p6
repeat these 2 rows 3 more times until 8 rows of heel have been worked
row 26: k3, k2tog through the back, k1, turn leaving 1 remaining stich of heel on needle (see photo step 1)

Step_1
row 27: slip 1, p4
row 28: k2, k2tog through the back, turn leaving remaining 2 stiches on needle
row 29: slip 1, p2
row 30: k2, k2tog through the back, k1, turn
row 31: slip 1, p3
leaving these 4 stitches on needle with the main part of the stocking, slide all the work along needle, turn with wrong side facing and resume working the other side of the heel (see photo step 2).

Step_2
reverse row 18: with wrong side facing and using 110cm length of yarn cut earlier*, p7 and turn leaving remaining stitches on needle
reverse row 19: slip 1, k6
repeat these 2 rows 3 more times until 8 rows of heel have been worked
reverse row 26: p3, p2tog, p1, turn leaving 1 remaining stich of heel on needle
reverse row 27: slip 1, k4
reverse row 28: p2, p2tog, turn leaving remaining 2 stiches on needle
reverse row 29: slip 1, k2
reverse row 30: p2, p2tog, p1, turn
reverse row 31: slip 1, k3
row 32: with right side facing rejoin main colour and begin knitting across first 4 stitches of heel shaping, pick up 5 stitches from inside edge of heel (see photo step 3), knit 11 stitches across main part of stocking, pick up 5 stitches from inside edge of 2nd heel half and knit final 4 stitches (29 stitches on needle) (see photo step 4)

Step_3
Step_4
row 33: purl
row 34: K8, k2tog, k9, k2tog through the back, k8
row 35: p7, p2tog through the back, p9, p2tog, p7
row 36: K6, k2tog, k9, k2tog through the back, k6 (23 stitches)
row 37: purl
work a further 8 rows of stocking stitch (knit on right side, purl on reverse)
row 46: with right side facing change colour for toe cap (see photo step 5) and work 2 rows

Step_5
row 48: K3, K2tog through the back, k4, k2tog, k1, k2tog through the back, k4, k2tog, k3
row 49: purl
row 50: K3, K2tog through the back, k2, k2tog, k1, k2tog through the back, k2, k2tog, k3 (15 stitches) (see photo step 6)

Step_6
row 51: purl
Making Up:
Cut work from the ball leaving a long end for sewing up. Thread end through 15 stitches on needle (see photo step 7) and pull up tight.

Step_7
Join seam running up bottom and back of stocking using mattress stitch (see photo step 8).

Step_8
Turn inside out and tie up all ends securely and trim - no need to sew them in. Turn right side out.
Hanging loop: cast on 35 stitches and then cast them off. Double strip over to make a loop and sew to back of stocking. Secure with a cute button.
Stockings
Copyright © Julie Williams 2005.

Felt Christmas Ornaments

Saw these and I had to share. Next year I am going to make these. I don't have time this year but I am excited for next year.

Bugs and Fishes blog http://bugsandfishes.blogspot.com/

Bugs and Fishes blog has a lot of felt crafts. Here are some nice cute crafts ideas and I hope they inspire you.


Crochet ornaments

If you are crafty here is another cute ormanent idea. Thanks to Janice again for telling me about these so I can share them with you. I have included the link for Pickles blog.

Granny X-mas

Please note: This pattern uses American terminology.
English (British) in the first coloumn.
  
Chain stitch (ch)Chain stitch (ch) 
Double crochet (dc)Single crochet (sc)
Half treble crochet (htr)Half double crochet (hdc) 
Treble crochet (tr)Double crochet (dc)
Double treble crochet (dtr)Treble crochet (tr) 
Triple treble crochetDouble treble crochet (dtr)
Cast offBend off / fasten off
TensionGauge

Materials

Pickles Merino Lace
, 2 balls
Crochet needle US B/1
How we did it
8 chainstitches. Make a loop with a slip stitch into the fist chain stitch.
2 chain stitches (= the first double crochet). 2 double crochets into the ring. 1 chain stitch.
*3 double crochet, 1 chain stitch* Repeat from * to * 5 times in total. Finish with a slip stitch into the first double crochet.

Turn the work. 2 chain stitches (= the first double crochet). 2 double crochets into the hole where the chain stitch from the previous round is. 3 chain stitches. * 3 double crochets into the next hole, 3 chain stitches* Repeat from * to * 5 times in total. Finish with a slip stitch into the first double crochet.
Turn the work. 2 chain stitches. 6 double crochets into the hole. 1 chain stitch.
* 7 double crochets, 1 chain stitch* * 3 double crochets into the next hole, 3 chain stitches* Repeat from * to * 5 times in total. Finish with a slip stitch into the first double crochet. Cut the yarn and pull it through.
You are now done. To create some hold for the decoration, we used 1 ts gelatine and 100 ml water. Dip it into the gelatine water and let it dry on a plate. 

Crochet mini stockings

Someone forward these and I had to share. I gave you the link that I found them.

http://horizontaldesigns.blogspot.com/2013/11/free-crochet-pattern-marvelous-mini.html#.UpQ3vujn95w

FREE CROCHET PATTERN: Marvelous Mini Stocking Ornament

I actually made these last year, and I'm really happy I kept the pattern because I'm making them again this year, they are great gifts you can make with scraps and are super fast (ninja
crochet!). I even made a German colored one for my MIL!

 Materials:

- Very little yarn, any weight
- Suggested hook size for yarn
- In the red stocking, I used Lion Hometown Chunky yarn (with hook size 8), and RH Super Saver in White (hook size 5.5mm)
- Tapestry needle for weaving in ends


Pattern:
*Turn at the end of each row
* Leave long tails for sewing
* Beginning ch counts as first st
*This pattern is for the red example above. You could adjust this pattern very easily to customize your colors.

1. With Color A: Ch 20, turn
2. Dc in 3rd ch from hook, and across (18)
3. Ch 2, dc across (18)
4. Repeat Row 3, ss to join and tie off (18)
5. Skip 6 st, join yarn in 7th st, dc next 6, turn (6)
6. Ch 2, dc across (6), ss and tie off
7. Join White yarn, ch 2, dc across, turn (6)
8. Ch 2, hdc across (6), ss and tie off

You are now going to fold the piece in half with the WRONG SIDE facing you, and sew along the seams to shape your stocking. Make sure you use the same color to seam that is on th stocking (red with red, white with white), because the yarn with show through.


Leave the top open, and weave in ends. Then you can create a hanging loop if you like. Mine was a chain 20. Then sew it in Row 7 or 8 so your mini stocking hangs at a nice angle :)

 Whaaaa la! Cute mini stocking in a few minutes!


Happy Holiday Hooking!!!
---Claire


 ***Feel free to use your work from my free patterns for whatever purpose you like of course (you legally can sell your work from ANY pattern in the US according to copyright law, you just can't take someone's pattern and claim it as your own). Please do not copy and post these patterns and claim them as your own. You may re-blog or link to anything in it's entirety. You may share photos that include the Horizontal Designs text only.