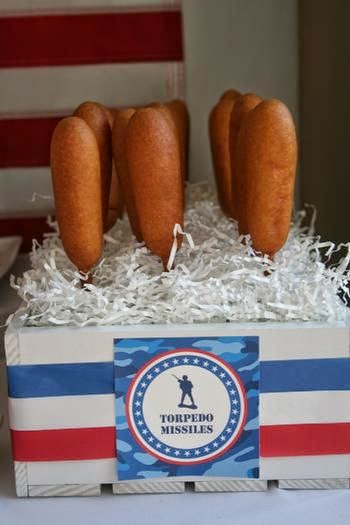
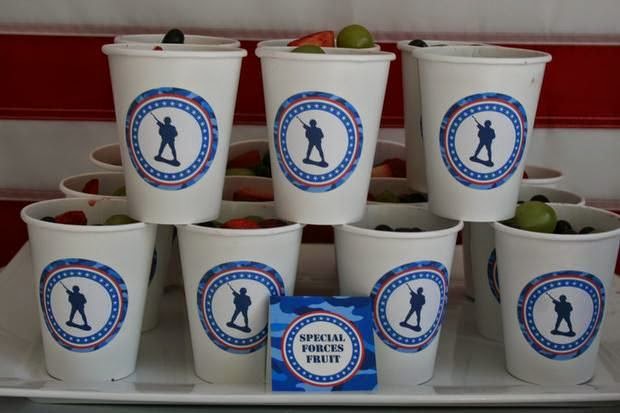
Here are some great ideas for a military birthday party. They would be fun for anyone at any age and they are simple and fun. It would be ideal for a Marine or Army party. Also would be good for a family member that is about to be deployed or coming home. I hope you like the ideas.
Showing posts with label Crafts. Show all posts
Sunday, November 9, 2014
Monday, November 3, 2014
More King Tut Crafts
Here are some more fun stuff for the kids. This is an idea that can be used with the last blog on the collars and cuffs. This is great in making scarabs. You use plastic spoons and draw on the backs. They were just to cute not to share with you.
Below are some more Egyptian crafts to do for fun. I hope you have fun with them.
Sunday, November 2, 2014
King Tut Day crafts
On November 4th, 1922 King Tukankhamun tomb was discovered. They entered the tomb later that month but they celebrate King Tut on the day on November the 4th. So lets take some time to celebrate with some crafts. Here we go..
Here are some bracelets. They can be made from cardboard or plastic. It is a nice way to recycle some of those plastic bottles. I have seen some made from plastic cups too. Next you will need to know which kind of spay paint to buy. Some of them are not for plastic and some are There are some that you will need to buy a sealer to go with it. Don't be afraid to ask questions at your local craft shop. Go a head and use macaroni and other house hold stuff to embellish the cuffs.


Here are some Egyptian collars that are made from paper plates. There are different ways to cut them. The one above is a half collar that is tied off with string. The ones on the right are a full collar that does not need string.
As I was choked before I really don't like things tightly on my neck so if I was doing it for myself I would do the half collar. You will need to know your child to decide on which one to make.
You can use markers, water colors and even crayons to decorate them. Feel free to let them add some macaroni to give it a more 3-D look. You can add some jewels or glitter to make them stand out.
I hope these give you some good ideas. This will be a great idea for not only for King Tut Day but for all Egyptian holidays and maybe just dress up fun. Enjoy.
Here are some bracelets. They can be made from cardboard or plastic. It is a nice way to recycle some of those plastic bottles. I have seen some made from plastic cups too. Next you will need to know which kind of spay paint to buy. Some of them are not for plastic and some are There are some that you will need to buy a sealer to go with it. Don't be afraid to ask questions at your local craft shop. Go a head and use macaroni and other house hold stuff to embellish the cuffs.


Here are some Egyptian collars that are made from paper plates. There are different ways to cut them. The one above is a half collar that is tied off with string. The ones on the right are a full collar that does not need string.
As I was choked before I really don't like things tightly on my neck so if I was doing it for myself I would do the half collar. You will need to know your child to decide on which one to make.
You can use markers, water colors and even crayons to decorate them. Feel free to let them add some macaroni to give it a more 3-D look. You can add some jewels or glitter to make them stand out. I hope these give you some good ideas. This will be a great idea for not only for King Tut Day but for all Egyptian holidays and maybe just dress up fun. Enjoy.
Monday, October 27, 2014
Pumpkin Seed projects
One of the most popular symbol for Samhain, Halloween and Thanksgiving is Pumpkin. Pumpkin pie is one of the most popular desert for after Halloween and Thanksgiving. After you carve your jack-o-lantern you have lots of pumpkin seeds. There are lots of different crafts that you can do with pumpkin seeds. Depending on your project will determine if you need to color them. You should try coloring them as it will spruce up any project.
You can paint or draw on a pumpkin seeds. I have used markers, but you will need to get the fine tip as the seeds are so small. I had a friend that was proficient at using a pin as a paintbrush. I am not that artistic but it is worth trying. One idea is to make a rune set out of the pumpkin seeds. I was a mini tarot card set on the seeds. It was amazing to see.
Now I have done some research on how to color pumpkin seeds and I got a lot of mix and match suggestions. I will give several different tips of the different ways to color them.
First you need to wash them, pumpkin seeds have a film on them and it needs to be washed off. You need to lay them out on a towel or parchment paper to dry. Let them dry completely before trying to color them, so it may take 24-48 hours to dry.
One tip is that you take a glass jar and put 2 teaspoons of rubbing alcohol and add food coloring to the color that you want. Stir them up after a couple of minutes. It may take a few minutes to get the color. Remember that they will dry lighter so if you need to add more drops of food coloring add them. Once they have reached the desired color, take them out and let them dry on parchment paper or a towel. Turn them over after a couple of hours so they don't stick to each other. Let them dry for 24-48 hours before making your projects.
In another tip is to take a sealed baggie and put 1-2 teaspoons of warm water and drops of food coloring then add your seeds and shake them up. Don't add too much water on this one and make sure the bag is sealed before you start to shake. Kids will always like this part, you can throw on some music and let them shake and shake. Open up the bag and lay them out on a towel or parchment paper to dry. Again turn them over after a couple of hours so they don't stick. Let them dry for 24-48 hours before making your projects.
Yet another tip is to take a sealed baggie and put a tablespoon of vinegar and food coloring and add your seeds and shake them up like above. Again don't add too much vinegar and just keep shaking. Once they are evenly coated take them out. Now in a couple of blogs people just let them dry but some said to bake them at 375F for 45 minutes. Another version is to add a 1/2 cup of warm water and a tablespoon of vinegar then add your seeds. Now to get the appropriate color could take an hour. After wards take them out to dry for 24-48 hours. Remember to turn them over after a couple hours. Some suggestions is to bake them for 20 minutes at 200 degrees.
You have several different ideas on coloring seeds, now you need to choose which way to color them. You will need to experiment and choose the one that you prefer. We do not bake our seeds, mostly because we do not have an oven, so it takes longer to dry.So now you are ready for some cute projects. Jewelry is the most popular craft that I have been told. You can make pumpkin seed necklaces that are not colored and they still look cool. There are different ways to sting a necklace together. Just to warn you that unless you poke a hole in the seed first, it may not be suitable for young kids. I have poked my fingers until they bleed while stringing seeds. Again you may want to experiment a head of time so you can tell what kind of help your kids will need.
The other thing to take in account is the wasted seeds that you will be using. There will be mistakes so make sure you have more than you need for the project. You can always store them in a plastic bottle to use for next year or for more projects.
Like I said there are different ways to make the jewelry and what kind of string. I have read that some people use regular string, embossing thread or even fishing line. I prefer using fishing line but embossing thread comes in different colors so it can set it off and give it the final touch. Adding beads to them will also give it a touch, but it is all up to you.... sorry up to your child.
One last tip before you tie off the necklace. If you want the necklace to last for a couple of years you can tie it off but if you want it to really last you may want to seal the seeds with a spray of shellac or another type of sealer. I have read it both ways that some people do it after they make the holes and then sting them up, but some do it after they string them but before they tie it off. You can take them outside and hang them across somewhere and make sure there is some space in-between them, and then spray them. That will seal the color on the seeds and help in transfer to your clothes. So the next craft is making pictures with the seeds. It is time to be creative and have some fun. You can take some coloring pages and have the little goblins glue the seeds on the pictures or you can design your own. The important thing is to have some fun.
Wednesday, October 8, 2014
Ravens Blight
I have to tell you of a great site that any fan of Halloween must visit. Now this is a site of paper toys. I may not be the best folder but I can't to try more of these. They have tons of stuff and many of them are free to print off. Their products include models, puppets, jewelry and games. You really need to check it out. You can crate a great Halloween fun if you use these as decorations. The other fun is having an early Halloween party and have some of these as the craft to make. Either way they are so cool. I have made up the dice an people loved them. Just to warn you it is best for you to print these as black and white so you can practice in the folding. Then you can spend money on the color copies. You may want to copy them on stronger weight of paper too. But be careful on how much money you spend because you could be spending more than you think. I have been caught in that trap before so plan ahead. So without more, here are some of the fabulous stuff that you will find at http://ravensblight.com/papertoys.html.


Now remember what I have said about any craft, it is all about having fun and being creative. Those little imperfections that happen just gives your craft a personal touch. So have fun and be adventurous.
Coriander Bats
Wednesday, May 21, 2014
Create your own Fairy house
Now these are just tip to give you some ideas to create your own Fairy Houses for your home or garden. They are by no means a step by step process. So here are some that I found all over the internet and Pinterest. None of these are mine, I just collected them.
Sooo, here goes.
Here is our first one. This is a cute idea using a PVC flower pot. Now they made the windows with solar panels so they light up at night. Just remember to use the right paint. Not all paints work on PVC and are for outdoors. If you are unsure, please ask your local hardware store. I really enjoyed how they finished off the house with the pebbles, it really gives it the authentic look. Here is the site I found this at: http://tahanidesigns.blogspot.com/2012/09/fairy-house-homemade-durable-and-solar.html
To the right you have a rain boot. I had to include this as it was just too funny but creative. It only proves that you can use just about anything. I don't know where I got this, or if someone could have sent it to me. I just think that it was too cute not to share it with you.
This one is nice if you have a border in you garden. It looks like a 3-D type. I am not sure how to do it but it might be fun to experiment .
On the right we have a large juice bottle with colored popsicle roof. The siding is made from colored straws and more popsicles for the door. It is really cute and bright for kids.
Here is another fun project to do with the kids. You start with an empty milk or juice carton. This one is more an earthy tone. Gather up twigs and an adult will need to use pruning sheers to cut them to the right size. You then cut the window frames and doors with popsicle sticks. Hot glue them on the box and then make you roof and glue them on. Decorate as needed.
Here is an idea using an old terra cotta pot and rocks. The metal arch helps give it stability. I bet you could use a broken one if you had some lying around. My nephew cut the lawn and he broke a couple of my moms.
Using an old bird cage is a great idea too. There is so many ideas that you can do with it. Moss really works out for the roof.

I found this picture and I loved it. There are no instruction to this but I had to add. I am not so crafty to know how to start this one. I guess that lots of glue or grout on a surface and then using black sand and then stones. But I guess this one I will need to do more research for it.
I hope this gives you some ideas. Now remember what I have said about any craft, it is all about having fun and being creative. Those little imperfections that happen just gives your craft a personal touch. So have fun and be adventurous.
Sooo, here goes.
Here is our first one. This is a cute idea using a PVC flower pot. Now they made the windows with solar panels so they light up at night. Just remember to use the right paint. Not all paints work on PVC and are for outdoors. If you are unsure, please ask your local hardware store. I really enjoyed how they finished off the house with the pebbles, it really gives it the authentic look. Here is the site I found this at: http://tahanidesigns.blogspot.com/2012/09/fairy-house-homemade-durable-and-solar.html
To the right you have a rain boot. I had to include this as it was just too funny but creative. It only proves that you can use just about anything. I don't know where I got this, or if someone could have sent it to me. I just think that it was too cute not to share it with you.
This one is nice if you have a border in you garden. It looks like a 3-D type. I am not sure how to do it but it might be fun to experiment . On the right we have a large juice bottle with colored popsicle roof. The siding is made from colored straws and more popsicles for the door. It is really cute and bright for kids.
Here is another fun project to do with the kids. You start with an empty milk or juice carton. This one is more an earthy tone. Gather up twigs and an adult will need to use pruning sheers to cut them to the right size. You then cut the window frames and doors with popsicle sticks. Hot glue them on the box and then make you roof and glue them on. Decorate as needed. Here is an idea using an old terra cotta pot and rocks. The metal arch helps give it stability. I bet you could use a broken one if you had some lying around. My nephew cut the lawn and he broke a couple of my moms.
Using an old bird cage is a great idea too. There is so many ideas that you can do with it. Moss really works out for the roof.

I found this picture and I loved it. There are no instruction to this but I had to add. I am not so crafty to know how to start this one. I guess that lots of glue or grout on a surface and then using black sand and then stones. But I guess this one I will need to do more research for it.
I hope this gives you some ideas. Now remember what I have said about any craft, it is all about having fun and being creative. Those little imperfections that happen just gives your craft a personal touch. So have fun and be adventurous.
Subscribe to:
Posts (Atom)